Docking - Getting Started
Docking - Getting Started
How To Add Docking To Your Application
This tutorial is going to explain how the docking system works by walking you
through the process of adding docking capabilities to a new application. At the
end of the process you should have a basic understanding of how the docking
system works. This will allow you to then pick and choose from the remaining
docking topics depending on your application needs. Ideally we recommend that
you scan all the intermediate topics in order to get a feel for the capabilities
available from the docking system.
Finished Example
At the end of the tutorial you should have Figure 1 as the end result. This end
result will show how to add docking to a KryptonPanel instance. The panel has
a filler control that is an instance of the KryptonDockableWorkspace that
holds the pages 'Page 1' and 'Page 2' as seen in Figure 1 below. This is the
filler control that takes up all the remaining space after the docked/auto
hidden pages are sized and positioned. At the bottom of the panel are two docked
pages named 'Page 3' and 'Page 4', on the left edge is an auto hidden group
with three pages named 'Page 5', 'Page 6' and 'Page 7' and finally a
single floating window is displayed to the bottom right of Figure 1 containing
two more pages titled 'Page 8' and 'Page 9'.
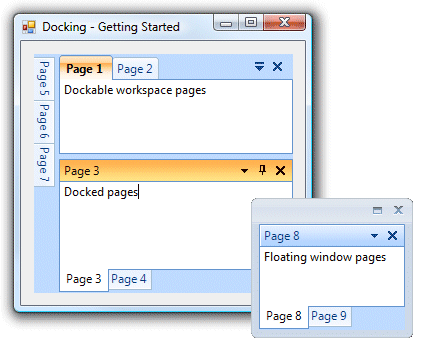
Figure 1 - Tutorial end result
Design Time Actions
Begin by creating a new windows forms project that results in an empty Form
instance. Drag and drop a KryptonPanel onto the form and position it to take
up all the client area except a small border around the edge. Now drag and drop
a KryptonManager instance onto the Form followed by dropping a
KryptonDockingManager instance. Both the KryptonManager and
KryptonDockingManager will be added to the icon tray area of the design
surface. The result of these actions can be seen in Figure 2.
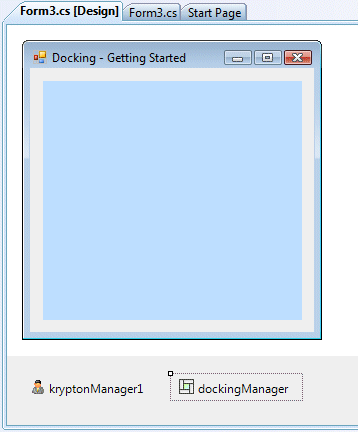
Figure 2 - KrytonPanel and icon tray components
Our final design time task is to setup the panel filler control. Drag a KryptonDockableWorkspace from the Toolbox and drop it onto the KryptonPanel. Once dropped you should use the properties window to set the Dock property of the KryptonDockableWorkspace to be Fill. This ensures that the dockable workspace takes up all the space within the panel. Later on when we add docking elements the dockable workspace will automatically be reduced to the space that is left over after positioning the docked and auto hidden elements. Without setting the Dock property we would have docking elements overlapping the dockable workspace leading to user confusion.
In your own application you could ignore the dockable workspace and instead place whatever is appropriate for your own needs. In that scenario just drop your own control into the panel but remember to set the Dock property to Fill. Alternatively you might not want any control to act as the panel filler in which case ignore this step entirely. The docking system is perfectly capable of working when there is no filler control taking up the remainder space.
Referencing Krypton Assemblies
Dragging and dropping the various Krypton components and controls above will
have added project level references to the appropriate Krypton assemblies. You
can add references manually by right clicking the References folder in
your project and then using the 'Add Reference...' context menu option. The
presented dialog box is then used to add references by selecting the .NET tab
and then searching the presented list of assemblies for the
Krypton assemblies. Alternatively select the Browse tab and
then navigate to the file location of the assemblies.
Once the project references are in place we need to add some 'using' statements to the forms code file. This makes it easier to write code that involves the Krypton components without the need to fully scope them. Open up the form code file and add the following statements to the existing entries...
    using Krypton.Toolkit;
    using Krypton.Navigator;
    using Krypton.Workspace;
    using Krypton.Docking;
Creating Pages
Now we need to add some simple code that creates KryptonPage instances that
can be added as docking pages for display. Our example code merely creates pages
that contain a simple KryptonRichTextBox instance that is docked to fill the
entire page client area. Your own real world applications would create something
more interesting. For more details on the best practice for creating docking
pages see the Docking Page Creation section.
Take careful note of the line setting the 'page.UniqueName' property. It is
important that each page in your docking system has a unique name because the
docking system always assumes that all pages have a unique value for this
property. Although each KryptonPage when constructed is given a unique name by
generating a GUID you are advised to set this yourself. Using your own names
such as 'Properties', 'Output' and 'Document' is much easier than working
with a GUID like 483CC32A643F4AB7483CC32A643F4AB7.
Copy the following code into your form code file for use later on.
    private int _count = 1;

    private KryptonPage NewPage()
    {
        // Create and uniquely name the page
        KryptonPage page = new KryptonPage();
        page.Text = "Page " + (_count++).ToString();
        page.TextTitle = page.Text;
        page.UniqueName = page.Text;

        // Add rich text box as content of the page
        KryptonRichTextBox rtb = new KryptonRichTextBox();
        rtb.StateCommon.Border.Draw = InheritBool.False;
        rtb.Dock = DockStyle.Fill;
        rtb.Text = "Page Content";
        page.Controls.Add(rtb);

        return page;
    }
Adding Dock capabilities
We are now ready to actually add some docking specific code. At design time you
need to double click the caption area of the form in order to auto generate an
event handler for the Form.Load event. You should always wait until the load
event occurs before executing any docking code. Do not perform docking actions
in the constructor as the form has not been fully created and this will cause
problems to occur. We only need three lines of code to setup the docking
capabilities in this example. Add the following lines to the load event...
    private void Form_Load(object sender, EventArgs e)
    {
        KryptonDockingWorkspace w = dockingManager.ManageWorkspace("Workspace", kryptonDockableWorkspace1);
        dockingManager.ManageControl("Control", kryptonPanel1, w);
        dockingManager.ManageFloating("Floating", this);
    }
All three methods begin with 'Manage' and this indicates that they add docking capabilities based on the passed in Control or Form instance. Our first method is ManageWorkspace and is used to add an existing KryptonDockableWorkspace into the docking system. Note that you cannot add a standard KryptonWorkspace into the docking system, only the derived class KryptonDockableWorkspace that is a workspace that has been customized to work in conjunction with the docking system. The first parameter of the method call is a string that provides a unique name for the docking element that manages the dockable workspace. In this case we use the name 'Workspace'. We need to name the element so that we can refer to the element later on when using other KryptonDockingManager methods. It is also possible to add more than one dockable workspace to the docking system and so giving them each a different name allows us to correctly refer to the one of interest. The second parameter of the ManageWorkspace method is a reference to the existing dockable workspace control, which we added at design time in a previous step.
Line two makes a call to ManageControl and adds docking capabilities to an existing Control derived reference. It adds the ability to have docked and auto hidden pages and so we have passed in the 'kryptonPanel1' reference. This then allows us to have docked pages against the edges of the panel and auto hidden groups at the panel edges. We have provided a name for this docking element of 'Control' so we can refer to the docking element in the future. The final parameter is a reference to the filler control. In our case this is the KryptonDockingWorkspace element created on the line before. We need to pass this into the method so that the docking indicators are correctly provided on the filler area of the control.
Our third line calls ManageFloating and as the name suggests it adds the ability to have floating windows in the docking system. As always we have given it a name so we can refer to it later on, in this case 'Floating'. The second parameter is a reference to the Form that makes up the main application window. This form reference is used by the docking element as the parent of the docking windows that are created. This ensure the floating windows are associated with the main application form and so are automatically minimized when the main form is minimized and also ensures they always appear above the main form.
These three methods are all you need to setup the majority of docking scenarios.
Creating Initial Pages
Now we have docking capabilities setup we want to actually add some pages. In
our tutorial we will add all the pages inside the Form.Load event but you
could of course add your own pages in response to user actions such as pressing
buttons or the loading of files. Add the following four lines to create the
pages seen in configuration seen in Figure 1...
        dockingManager.AddToWorkspace("Workspace", new KryptonPage[] { NewPage(), NewPage() });
        dockingManager.AddDockspace("Control", DockingEdge.Bottom, new KryptonPage[] { NewPage(), NewPage() });
        dockingManager.AddAutoHiddenGroup("Control", DockingEdge.Left, new KryptonPage[] { NewPage(), NewPage(), NewPage() });
        dockingManager.AddFloatingWindow("Floating", new KryptonPage[] { NewPage(), NewPage() });
    }
All four methods begin with 'Add' and this indicates that they are adding pages into the relevant docking elements. Our first method is slightly different from the others as it starts with 'AddTo' which indicates that it is adding pages into an existing control rather than creating any new controls or docking elements. The AddToWorkspace method is used to add pages into a dockable workspace that has already been made part of the docking system via a ManageWorkspace call. We provide 'Workspace' as the first parameter as that was the name used in the original ManageWorkspace call. If we had added several different dockable workspace instances then this name would allow us to identity the one of interest. The second parameter is an array of KrytonPage references that are to be added into the workspace. To make the code easy to read we just make multiple calls to our NewPage() helper method as added in an earlier step. You can see the added pages as 'Page 1' and 'Page 2' in Figure 1.
The second method call AddDockspace is being used to add two pages to the bottom edge of the panel. We identify the target control using the first parameter and use the second parameter to specify which of the four control edges we are adding against. Finally our third parameter is the array of pages to be added. We provide two pages and so the docking area will have two pages in a tabbed appearance. You can see them as 'Page 3' and 'Page 4' in Figure 1. Adding a new auto hidden group is just as simple, just call AddAutoHiddenGroup and provide the same set of parameters as the previous AddDockspace method. You can see the auto hidden group on the left edge of the panel in Figure 1.
Finally line four adds a floating window that shows two pages in tabbed appearance. Just call AddFloatingWindow and provide the name of element that was just in the ManageFloating call along with an array of pages to be added. You can see the created floating window at the bottom right corner of Figure 1.
You can now compile and run the application.
Panel Filler Alternatives
If you prefer to use a navigator instead of the workspace as the panel filler
you can replace the KryptonDockableWorkspace instance with the
KryptonDockableNavigator control instead. This is a version of the navigator
that is customized to integrate into the docking system. In this case you would
simply replace the first two lines of the above Form.Load event code with the
following similar code...
    KryptonDockingNavigator n = dockingManager.ManageNavigator("Navigator", kryptonDockableNavigator1);
    dockingManager.ManageControl("Control", kryptonPanel1, n);
Then later on you would use the following AddToNavigator instead of the AddToWorkspace...
dockingManager.AddToWorkspace("Navigator", new KryptonPage[] { NewPage(), NewPage() });
Note that you can even omit the use of a navigator or workspace in which case you would remove the first line of Form.Load event code and remove the third parameter from the ManageControl call. You could leave the filler area of the panel empty or add some other unrelated control that does not become part of the docking hierarchy. The docking system can work perfectly well without any filler control or with a filler control that is not a navigator or workspace.